Friday, August 30, 2013

Butterick B4685

I had been watching for Butterick patterns to go on sale for a while, after falling completely into a state of longing for this pattern--B4685.  If you have seen the picture of view A, and can understand that this is exactly what I was looking for...perhaps you too will feel my grave disappointment when you see how this project turned out.

I made view A, cut a size 10, with some blotchy green cotton fabric I received for my birthday (thanks Mom, I love green).  This was to be a test, because the plan was to make it out of my most coveted favorite fabric in my stash...glad I did this, so very glad.

It was a mess.  A tent, is more like it.  Before the final touches I added, my husband said I could fit the cats in there too.  Sheesh.  Sure, tucking it in would help to some small degree, but that's not how I planned to wear this shirt.  It's a trick.  The pattern will not give you a shirt that looks that good.

OK, now that I've finished my venting...

The shirt itself is easy to sew, as advertised, and would have been a quick ordeal, if I had been satisfied with the end result.  So, it does have that going for it.  Also, they managed to fit all of the instructions on one page, even with the separation of views to sew.  Nice!  This would be a great pattern for a quick sew or a beginner.

In my version, I left out the lace, and simply made the casing for the elastic out of the shirt itself.  I found that the piece for measuring elastic around the neck was wildly long and opted just to hang a piece around me and cut it about there, which I adjusted tighter after inserting anyway.


Back

Front

Other changes I made:
  • I added 2 1/2 inches to the length of the pieces when cutting.
  • Added darts to the front to mimic a princess seam (I'm pretty sure that's what I mean?!).  
  • Added darts to the outside back to take in the huge amount of fabric back there.  
  • Then added elastic encased in fabric and attached this to the back outside darts to pull it in even further. 
Dart adjustment on back

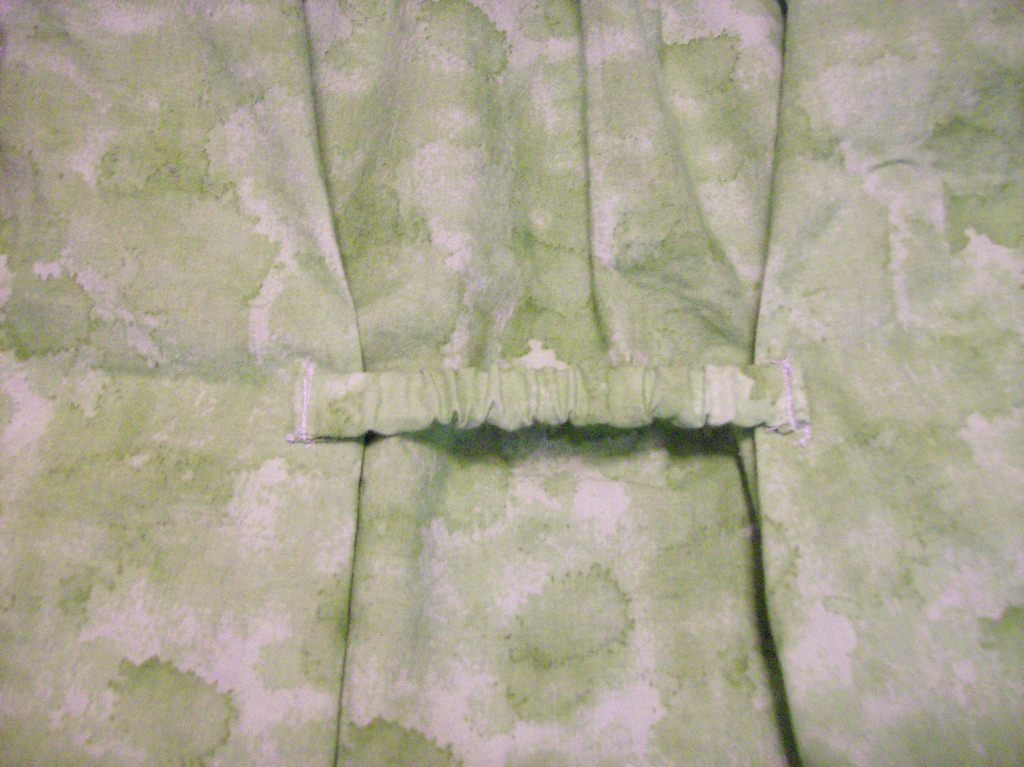
Extra elastic adjustment on back

Not sure if you can see the front darts...but they are there!


I still have plenty of room and it's easy to take on and off.  I just can't believe how big this turned out!

And yet, I am planning to give this pattern one more try, I have a remnant ($1) that I'd like to make view D out of, since I don't have much else I can do with just one yard of 45" wide.  We'll see how that one goes...
my confidence is waning. 


Simplicity 1881 Project Runway Dress


1881 Misses’ Knit Dresses in three lengths with bodice variations

I made size 4 of dress B, sleeveless version. (Sorry for the grainy photos!)


This pattern was, at times, a feat.  The worst of which was the neck/yoke, which came out far too small, pulling the bodice up and making the skirt very uneven from front to back.  Luckily, I had enough fabric to cut more pieces of this, adding a few inches (completed per pattern measured 21.5” down the middle of the yoke, mine re-done measured 29” the same way), but it was a real pain ripping the old one out.  I didn’t like the directions for the yoke either, and went with another way that made more sense to me: sewing the separate pieces together, then sewing the inside (top/nearest neck) seam of the yoke and yoke facing together, using interfacing in sections instead of a solid piece so that it adds stability and strength but also allows some stretch as well, then pressing in the bottom hem of the yoke, and pining the bodice pieces in place between the yoke and the yoke facing, then stitching the seam.  Sounds like a lot, maybe, but it was a lot clearer than the instructions.


Other complaints:
I saw no point in having a zipper in this dress, so left it out.

Also, there were no gather lines on the bodice front or back, so you don’t know how much you are supposed to pull in, or to fit between what section.

I think the midriff also could have been a bit longer; I really had to skimp on the seams.  And I’m not sure if I like the skirt gathers, which have stopping points on the sides, rather than an even gather all around. 

 As cut, the pattern also leaves you with the front being 2 inches longer than the back.


 No, I  can’t see that I’ll ever sew this pattern again.  I am glad that this project is done, it is only the second pattern by Project Runway that I’ve sewn, and it is likely that this is the last as I had major difficulty with the first as well.  Maybe it’s just me!  Good luck!


Friday, August 16, 2013

Mango Quick Bread

Here is a recipe derived from the book Sweet Hands Island Cooking from Trinidad and Tobago, by Ramin Ganeshram.  I made this bread this morning, although truthfully, I flubbed it a bit, left some out, and it still came out much better than I expected.  It's a really fun alternative to banana bread that is quick and easy to throw together.


This is the version of mango bread I made:                     Here is the official book version:

Ingredients                                                                    Ingredients
1 large ripe mango                                                        1 large ripe mango
1 t lemon juice                                                              1 t. fresh lime juice
1 t mango juice                                                             1 t water
2 C flour                                                                       2 C flour
3/4 C sugar                                                                  3/4 C sugar
1 T baking powder                                                        1 T baking powder
1/4 t cinnamon                                                              1/4 t cinnamon
1/8 t nutmeg                                                                 1/8 t nutmeg
1/2 t salt                                                                       1/2 t salt
1/2 t baking soda                                                          1/2 t baking soda
1 egg                                                                            1 egg
2 t oil                                                                            2 T canola oil
                                                                                    1 C (3 oz) chopped walnuts (optional)

Preheat the oven to 350 degrees.
Grease 9 X 5 loaf pan.
Puree the mango, with lime juice and water.
Move to large bowl, blend in egg and oil.
In a separate bowl, sift flour, baking soda and powder, salt, cinnamon and nutmeg, and sugar.
Add dry mixture to wet mixture in large bowl. Stir/blend just until combined.
Stir in nuts.
Spread into pan and bake for 40 minutes.
Cool in pan for 15 minutes, then remove to finished cooling.

Makes one loaf.


Notes on my version:
The changes I made to this recipe were to omit the nuts--seems like a whole cup would be far too many for this loaf of bread.  Used mango juice (had on hand to make popsicles) instead of water, used lemon juice instead of lime (had on hand), and reduced the oil.  I also didn't bother to puree the mango, just sliced it and chopped it small, then took the hand mixer to it.


I made a mistake when mixing this bread together.  I forgot to add the oil until the very end, oops, it wasn't easy to incorporate, but I did my best (actually I didn't try very hard).  The dough was thick and difficult to spread, I was very skeptical.  I had intended to add some coconut in place of the nuts for fun texture, but didn't want to use the coconut on a loaf that would end up a flop.  Next time I will use some coconut, because this bread came out great!

The crust was soft, the bread was dense, like a banana bread but the great mango flavor does come through nicely with just a hint of spice in the background.  A very nice change of pace!  Surprising considering how I flubbed the recipe...


Tuesday, August 13, 2013

Totally Fat Free Rich & Decadent Strawberry Frozen Yogurt

Sound too good to be true?  Well, this time it isn't!
I did it and so can you, and it's as easy as ... well, in fact, it's even easier than pie.

*With the help of your trusty ice cream machine, though it might work even without one...if you try it, let me know.

Ingredients:
2 1/2 C Plain, fat free yogurt (I use Great Value)
1/2 C + 2 t (6 oz total) Strawberry preserves (mine from the Dollar General)
1/4 Cup Sugar


Simplicity is beautiful, and even better, tasty, isn't it?


Monday, August 12, 2013

Potato Salad Without Dairy

Going to a picnic but don't want to drag a cooler?  Bringing a side dish but don't want to worry about refrigeration?  Or maybe just tired of the tried-and-true creamy potato salad?  Ready to try something a bit lighter and different?

I have the recipe for you!

The inspiration for this is that I'm trying to cut down on my dairy, and it's summer (!) so I want to feel like I'm eating lighter.  Anyway, it came out quite well.


What you'll need:

4 medium (to med-small) red potatoes
1/4 C thin (very thin) sliced onion
2 T vinegar
2 T olive oil
1/4 t sugar
2 t dried basil

What to do:

Slice potatoes and rough-cube them to about an inch by one half inch thick
Slice onion, and cut into pieces no longer than an inch
Boil potatoes just until they are getting easy to pierce with a fork, drain
While the potatoes are boiling, in a bowl mix together the oil, vinegar, sugar, and basil
Toss in the onion to coat
Add potatoes still hot from boiling and gently mix with vinegar mixture
Allow to cool on counter top, then refrigerate.  Taste develops even better overnight.


Talk about easy, eh?  And what a change of pace.  This potato salad does grow on me each time.  But here is a simple, basic method to get you started, let me know how you tweak it around!


Saturday, August 10, 2013

Berry Blast Pie

Well, I've always wanted to make a berry-only pie.  One day in the grocery store there was a large bag of various berries, strawberries (1 package), raspberries (2 packages) and black berries (2 packages) all ready to be used at their most ripe point for $2.  Who am I to resist?  The plan went into action...

A pie.
Of berries.
Whoa.


Unfortunately, the filling did not set as properly as I'd hoped, there was too much juice remaining.  But I learned that an all berry pie is not for me.  It was too much flavor, even with some ice cream to dilute the richness.  I also gained a wonderful, easy, quick crust recipe that I highly recommend.  No messing with ice cold water and cutting in fat just so...no, no, no, just beat this together and press it in.  I'd pre-bake it too, before filling.

Awesome crust recipe:
1 1/4 C flour
1 stick margarine
3 T brown sugar
1 egg

Press crust into pie pan, bake at 400 for 13-15 minutes.

Over the top, but unsuccessful, pie filling:
2 packages raspberries and 2 packages blackberries
1 package strawberries, sliced
3/4 C sugar
1 T lemon juice
3 T cornstarch
1/2 t cinnamon

I coated the berries with these ingredients, letting sit while the crust baked. 
Then added them and baked in the crust for 30 minutes.

Perhaps you can tell me where I went wrong?  It was just too much juice after baking.  Not enough cornstarch?  I don't know, but would value insight in case I ever venture toward baking a berry pie again.

Bottom line: keep the crust recipe, it's so easy and low hassle; ditch the berry filling recipe.  Sure was a pretty pie though.


Friday, August 9, 2013

Simplicity 1692-Vintage Top


Oh, my, I had been wanting this pattern...I plotted a trip to the city just to pick it up on one of those 99-cent pattern sales at the fabric store and then it was mine, all mine!  Ahhahahaha.  OK.

I'm actually not displeased with the way this top came out, which is saying quite a bit really, considering that I've a lot to learn about sewing and need more practice than I allow myself time to get.  But, that aside, this is such a cute pattern, I just love the vintage look. 

I sewed a size 10, because I always seem to run small with Simplicity patterns (anyone else?) and I'd much rather take it in, than hold my breath while wearing the garment which would inevitably then end up in the "never to be worn again" pile.  Sure, I tell myself to chalk it up to experience, but do I really learn from it?  We can only hope.

Now, back to the pattern.
I made view B, without the shoulder pads.  (I swore, never again...)
Really, I was true to the instructions, for the most part, except for the zipper part, I have to do that on my own, so that it makes sense.  There sure were a lot of instructions.  40 steps, some with multiple parts.  Seems like a lot to me. 
Pretty sure this was a clearance fabric I picked up at Hancock Fabrics.


Yes, it was a lot of steps, but I think it is well conceived, and do recommend it!


Maxi Dress-M6559

Hello!

I have been very bad about posting my sewing creations...and it's going to take me a while to get back up to current with all that.  In the meantime, I'll be putting up one at a time-glad I took notes on these patterns while I was sewing them!

Here is my attempt at a maxi-dress, my first ever to sew or to wear, thanks to McCalls 6559 pattern.  I'm not wild about it, I have to say.  It seems most of the time to just hang like a sack.  Don't know.  Thought my stripey fabric would have spiced things up, but perhaps if that's what I was after, I should have sewn view E rather than view D, eh?


This is the angle I like, the only angle I like of this dress...

As I indicated above, I made view D, the long, no-frills version.
I cut a size 6. 
For this dress, there were all 4 steps, so really, anyone can whip this out in no time.
The only variation I made, was to use lengths of fabric as bias for the neckline and arm holes.  Not sure if this was a good call or not, but I'd just completed another knit project where things got all bent out of shape by performing a rolled hem in those places.  Hmm.  Thinking of shortening the length, what do you think?


Even kitty is skeptical...


Wednesday, August 7, 2013

A Pack of Pickled Peppers

Yeah, I've in the past always sneered a bit at homemade pickled peppers.  Just didn't like them.  Always trying to be gracious and tasting them with an open mind...they just never did it for me.  Too sweet, too strong, something off in the spices.  But I have always loved pepperoncini since first trying one with a Papa John's pizza delivery.  For a while, I even got hooked on them and bought them by the jar-full.

My half eaten first batch


So, this was my first attempt pickling, well, anything.  And I had the lowest of expectations coupled with a bunch of banana peppers from a friend's garden overflow.  Did some poking around on the web for recipes, and compiled them, threw that away, and put this together from the inspiration.  It came out!  Well!
Must be beginners luck.

Ingredients:
6 banana peppers
3 small-ish garlic cloves
3/4 C distilled white vinegar
1 1/2 C water
1 T black peppercorns (whole)
1 T salt
2 t coriander seeds (whole)
2 t sugar

Method:
Slice and de-seed peppers, about 1/4 inch is ideal for use
Slice each garlic clove into thirds
In a stock pot, place all ingredients except the peppers and the vinegar
Bring to a boil, boil for 4 minutes
Reduce to a simmer, add vinegar
Remove from the burner and cool
Place sliced peppers in a storage container
Pour mixture over the peppers to cover
Let stand for at least 12 hours before serving, the longer, the better

Now you have made your own pickled peppers, the easy way!
Enjoy!  Today I had a delicious sandwich with cucumber slices, pickled peppers a-plenty, and a spread of ranch dressing-Excellent.


Monday, August 5, 2013

Pretty Purslane, to eat too


We've been enjoying our "salvage" plant picked up earlier this year from Lowes, which by the looks of it the only thing wrong was that one of the pots hangers was broken, and have become quite intrigued by the purslane plant.

Reasons I've found so far to love this plant:
1.  Beautiful mound of blooms
2.  Works with my watering schedule
3.  Cool, succulent type leaves
4.  The draping effect
5.  Attracts honeybees


And as if that weren't enough reasons to really enjoy this prolific plant, I've just discovered that it is edible!
That's right, the portulaca oleracea, my purslane, is enjoyed in Europe, parts of Asia, the middle-east and Mexico.  It is reported to have a slightly sour and salty taste.  Apparently, it is edible up to the root.

Has anyone ventured to try this?  Tell me what you thought?

I may go for it, but would rather not go in blind!

I'd also like to hear from anyone who has tried to winter these plants inside--success or failure, I'd like to know!


Saturday, August 3, 2013

Bellychain anyone?

Hello.

I was going through a shipment of old stuff that my mother was clearing out of her house, and came across this belly-chain that I wore....let's just say more than a decade ago.  I'd rather find a home for it than throw it away, and since I don't know anyone who is able to wear it, thought I'd put it up here and see if I have any takers.


I don't want any money for it, but would just stick it in an envelope and mail it off, being happy enough to have found a home for it.

Here are some details:

It is silver in color, with a length of 27 inches of chain.
The ornament, a silver flower with a black center, is about 1/2 inches in length.
It is completely functional, but I know I'll never be that thin again!

I've never done anything like this before, but I'm desperate to get rid of some things.
If you can manage to trust me, I'll treat your information with the utmost confidentiality (promptly losing it after sending), and even send to a PO Box if you've got one.

Anyway, if you are interested, post a reply to this posting and I'll get in touch.
No, this is not a scam; yes, it is entirely free; yes, there is only one chain.
?'s-post below.